
The weather has been extremely, disgustingly hot the past couple of days so we took off to the beach to cool off and cook some marshmallows. Of course I grabbed the camera fitted with the 18-70mm. I like this lens for the beach because it allows me to get wide landscapes but also focus in on details like sandcastles and marine life without having to switch lenses in a sandy environment.
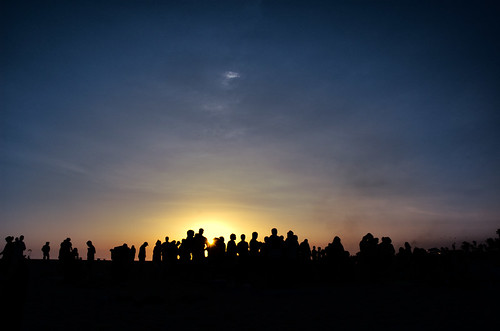
Here’s the photo I’ll be talking about. This is the original shot at 1/320s @ f/9. I exposed for the sky intending to silhouette the foreground and shot it in RAW mode for editing leeway.

This is an accurate representation of the scene. The problem, as I saw it, was that the sky was too yellow and the colors too muted. Reality is sometimes a let down. But I could see the edits I was going to make to this photo in my mind so all I needed was quality source material. This isn’t a case of trying to “save” a bad photo by editing it. Here I’m creating source material as the first step of a process.
No matter what you intend to do with a photo later, you need to have a good photo to begin with—as they say: garbage in, garbage out. In this case, I needed to capture detail in the sky and sun, I needed the silhouettes to be sharp and in focus, and I intentionally timed the shot so that the sun was peeking through the crowd to create a little flare and sun rays (that took a few shots to get right).
When I got the shot home, I loaded it up in my current RAW processing software of choice: LightZone. However, the edits I’m going to talk about should be fairly simple to do in almost any editing software from Raw Shooter to Paint Shop Pro to Photoshop so I’ll use generic language to describe my process rather than specific menu actions.
My first step was to bring out more detail in the sky and properly silhouette the foreground. This can be done in one step using Levels and adjusting the black point or the Curves tool (or in LightZone’s case, using the Zone Mapper).

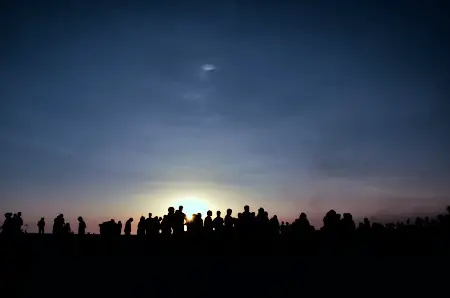
The vignetting in the upper frame is a natural result of the lighting conditions as the sun sets. That looks much better already. By silhouetting the foreground, a lot of distracting and unnecessary detail has been removed from the scene. And details in the sky and clouds that were hard to make out are much clearer. Compositionally, I shot this scene “top-heavy” knowing the black bottom 1/4 would balance it out.
But as I said before, I thought the scene was too yellow so the next step was to adjust the white balance to bring a rich, nighttime blue to the sky.
This brought the whole scene down to around 3300 K with a slight magenta tint.
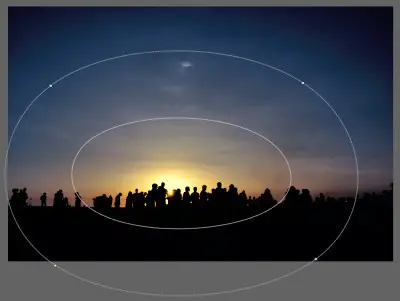
Finally, and the trickiest part of this edit, I needed to warm up the sun again. The white balance temperature change turned the sky the color I wanted but also cooled off the sun. What I needed now was to readjust the white balance of the sun to warm it up without affecting the rest of the photo. You can do this in many ways depending on your editing software. Software like Capture NX and LightZone allow you to define regions for an effect with a feathering zone. You’ll use a layer/effect mask instead in software like Photoshop and Paint Shop Pro.
In LightZone, I lassoed the area I wanted to warm up, and feathered it to blend it smoothly with the other edits. Here you can see the masked area and the result of the second white balance adjustment back up to 6800 K.
And here is the final result after a very slight noise reduction and subtle sharpening filter pass. You can click to view it larger.

Getting results like this depend to some degree on being able to visualize the result as you shoot. If you don’t know what you want, you can still get nice results from post-processing, you just won’t know what that result will be until you do it. No matter what your process is, it’s important to get quality source material for any kind of image editing. I shot this one photo in RAW because I intended to edit it later. The other 40 photos I shot that day were in JPG. But as you can see, the editing process itself doesn’t have to be difficult or time consuming (and in fact tends to be less so as the quality of the source increases).
()
发表回复